Some inbound-fax applications require not just an image of the incoming fax, but a fully editable document in Word, Excel, or PDF format. CopiaFacts can pass incoming documents to Optical Character Recognition (OCR) utilities for conversion to these formats, and can also retrieve the results for further processing using CopiaFacts scripting if required.
For best OCR results, you should encourage fax senders to use high-res settings when transmitting faxes to you. Some OCR software may also not be able to handle low resolution faxes where the horizontal and vertical resolution is different, in which case you can try saving the TIF file as PDF using the options in the CopiaFacts standard scripts.
Earlier releases of CopiaFacts supported an API provided by an OCR supplier which is no longer available. There are now two main routes to using OCR on incoming faxes:
•If the OCR utility supports command line operations, you can invoke the OCR conversion on an incoming file from a CopiaFacts script, and use command-line parameters to specify (or to select an option set which specifies) the operation you want to do and the type of output document to be created. The script can select what types of OCR conversion you wish to use for different fax senders using parameters in the USR profile selected from the DID or fax TSI of the inbound call. Post-receive scripts should normally generate a worker-box FS file to initiate further lengthy processing of a received fax: this frees the CopiaFacts fax channel to receive another fax immediately and minimizes the chance of incoming faxes not finding a free channel on a busy system. You should use this technique when directly invoking an OCR operation in this way.
•Some OCR software will also monitor a folder for files which are to be converted, in which case the CopiaFacts post-receive script merely has to save the incoming file in an appropriate folder. The save can therefore be done directly in the post-receive script. Again, different folders, configured for different OCR options and output document types, can be selected based on the DID or fax TSI of the inbound call.
There are a number of capable OCR software solutions to which CopiaFacts can send inbound faxes for conversion to editable format. Copia has had good results with Abbyy FineReader, which has a 'hot folder' feature (in some editions) which implements the second method above. FineReader also seems to deal reasonably well with low-resolution TIF files, unless the font size is very small.
Example OCR Settings for Abbyy FineReader
(note that Abbyy FineReader Corporate Edition is required for the 'Hot Folder' feature)
To process incoming fax TIF files to Word OCR, first modify the copy of the dnis.USR profile for the user(s) requiring this option. Add PRI_SAVE to the list of tasks in the PRV_TASKS variable; if no other immediate notification of the received fax is needed you can remove the other task names. Then specify the option of saving the TIF file, and specify the hot folder to be used:
...
$var_def PRV_SAVETIF_FLAG T ; save TIF file
$var_def PRV_SAVETIF_FOLDER "FFBASE\HOTFOLDER1"
...
Next, configure a Hot Folder task in Abbyy FineReader. Usually the first step will specify scanning every minute, and the second will specify a suitable hot folder (visible to all CopiaFacts nodes if more than one is configured to receive inbound faxes). You may also wish to specify copying the TIF after OCR processing, but there will still be a copy of the received TIF in the folder named in your MBX file, so TIF can be deleted after OCR if you prefer.
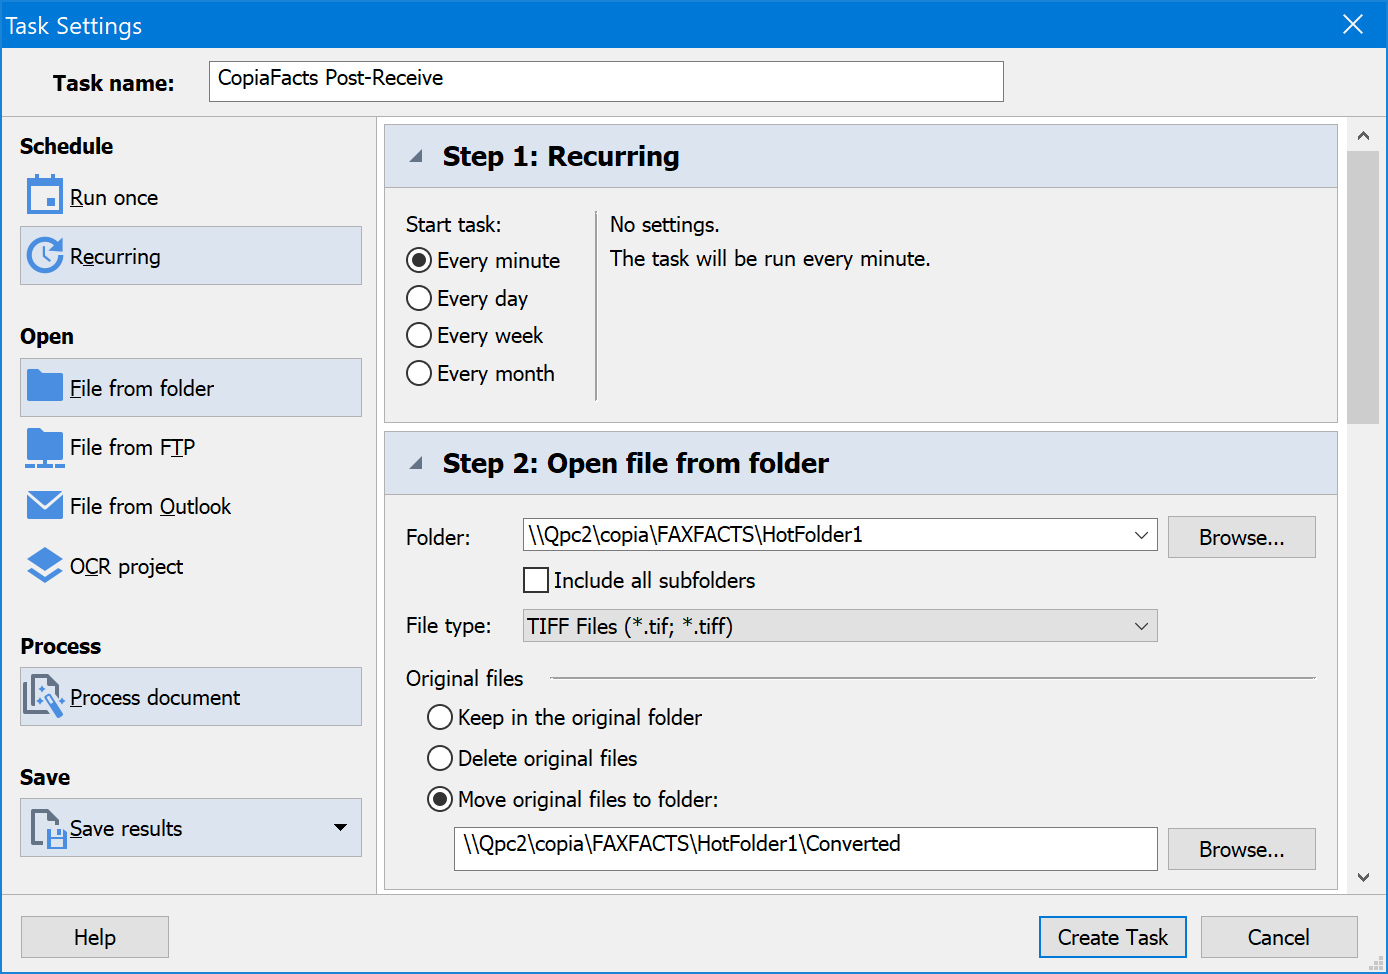
The third Hot Folder task step will configure the recognition language(s) and options; if you are always receiving a specific format document, you can also specify the document areas that you wish to be processed. In the fourth step you will specify the document format you wish to save, and the filename pattern. This example assumes you will specify [F] as the filename, which retains the file name of the TIF file; however for a specific OCR application you can add any of the available naming options.
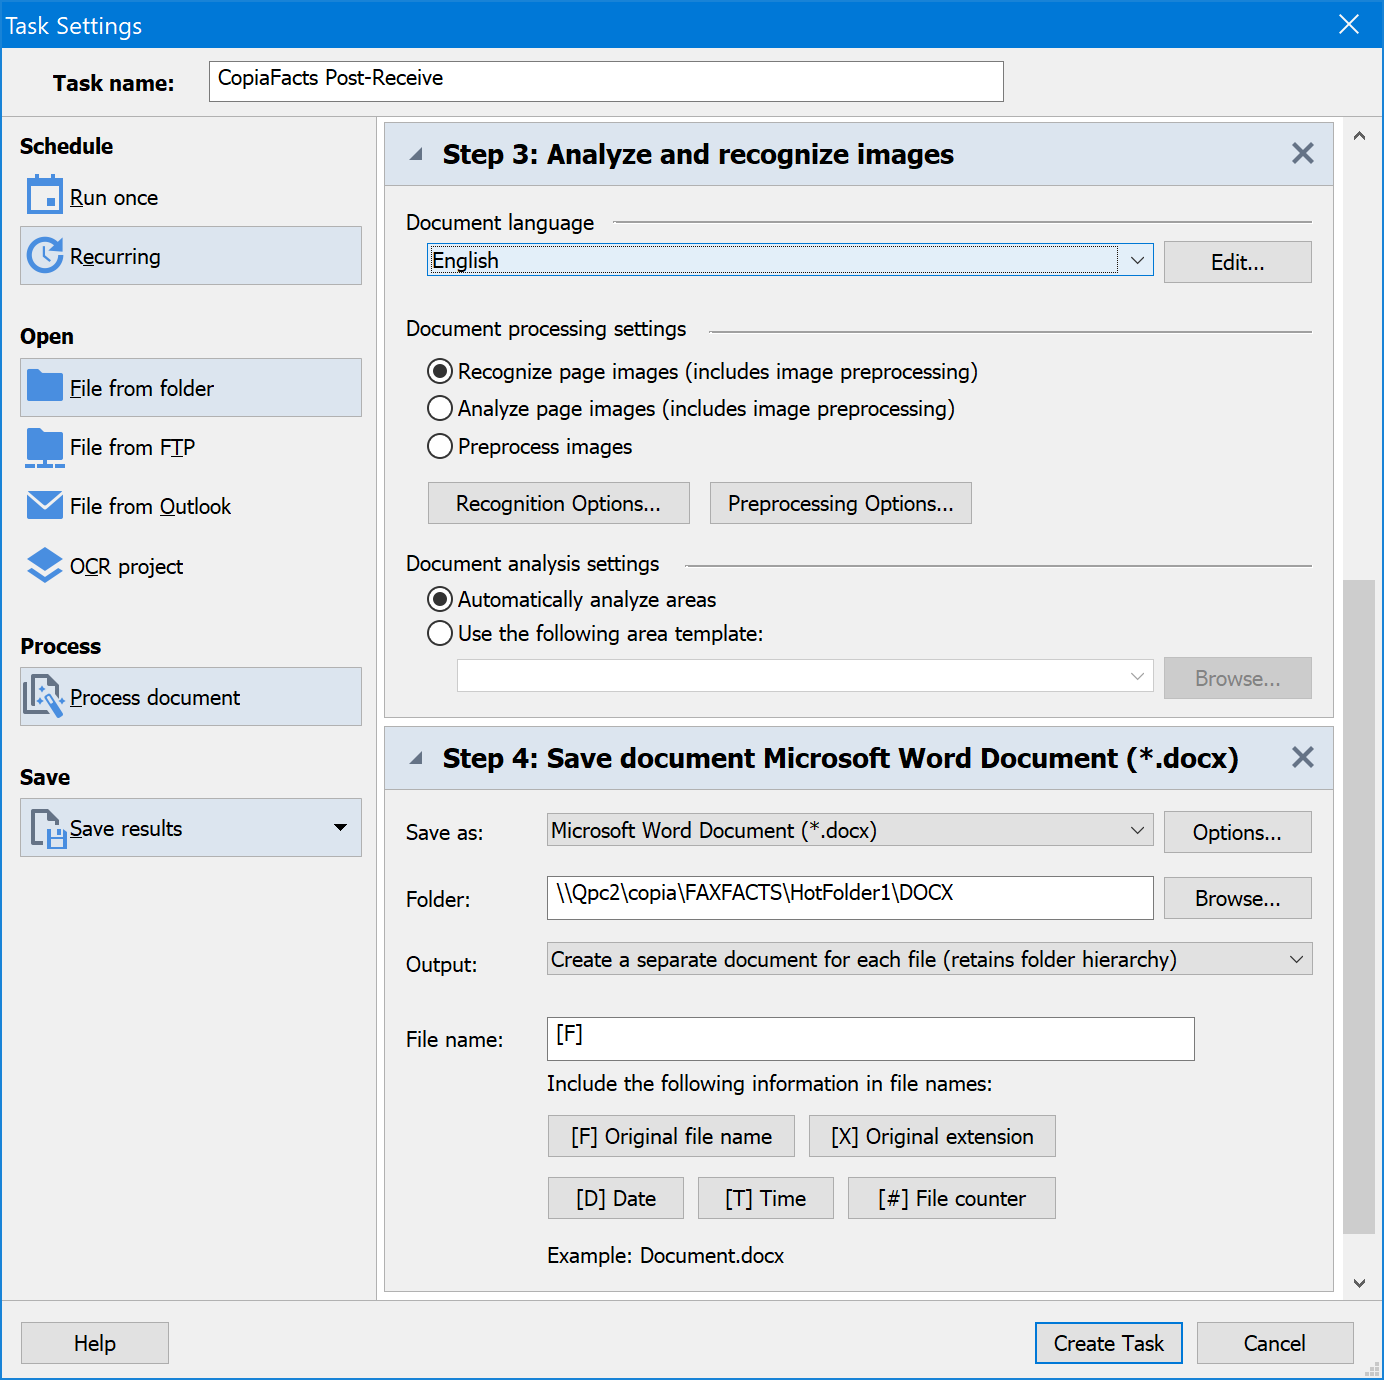
The sample settings above will simply leave a DOCX file in the specified folder. However if you also need to customize the processing of this file using CopiaFacts scripting, you can use the FFEXTERN special process FXFSGEN to scan for the converted files (DOCX in this example) and generate a worker-box FS file to initiate your script. In this case you should also change the file name of the saved TIF file in SCRIPTS\PRI_SAVE.IIF so that includes the user profile name (which will normally match the MBX name). Change line 90 of this standard script file to:
$set_var dest '@^PRV_SAVETIF_FOLDER\@PR%MAILBOX_@PR%FAXFILE')
$set_var TMPV_TEST "$fn:CopyFile('@PR%FAXPATH', '@dest')"
This syntax will then allow the FFEXTERN special process FXFSGEN to create a worker-box FS file to process the DOCX file further, using options you can specify in the template (dnis.FST) selected by the special process. This procedure also provides you with access to any variables defined in the user profile for the sender DNIS.